Products and Services
for Embedded Systems
|
Products and Services |
The prototyping system main board includes mounting holes for fitting into a Serpac S or SL series plastic enclosure. The following table lists the compatible enclosures with their heights and other information. All are 6.88 inches wide by 4.88 inches deep (outside dimensions given in all cases).
|
Series |
Part No. |
Height |
Front |
Top |
9 V Bat. |
Mouser |
Drawing |
|---|---|---|---|---|---|---|---|
|
S |
171 |
1.52 in. |
- |
Textured |
No |
$8.00 |
|
|
S |
171i |
1.52 in. |
- |
Insert |
No |
$8.00 |
|
|
S |
172 |
2.01 in. |
- |
Textured |
No |
$7.64 |
|
|
S |
172i |
2.01 in. |
- |
Insert |
No |
$7.64 |
|
|
S |
173 |
2.51 in. |
- |
Textured |
No |
$9.01 |
|
|
S |
272 |
2.01 in. |
- |
Textured |
Yes |
$9.83 |
|
|
S |
272i |
2.01 in. |
- |
Insert |
Yes |
$9.83 |
|
|
SL |
17s |
2.49 in. |
1.53 in. |
Insert |
No |
$7.58 |
|
|
SL |
27s |
2.49 in. |
1.53 in. |
Insert |
Yes |
$9.18 |
For sloped top models (SL series), the height is given at the back and the third column (Front) gives the height at the front. This column is dashed (-) for flat top models (S series). The finish is textured to resist wear but where indicated the top has a smooth recess to accept a front panel insert. Some models have a molded-in 9-volt battery compartment with external access. All models are available in almond, black and gray.
Prices are given in the table from the distributor Mouser.com (catalog 616 page 1002). These prices exclude shipping charges, which tend to start at about $8.00 per order for USPS Priority Mail.
Selected enclosures are available from ECROS Technology. Six screws to mount the main board in the enclosure are included in the price.
![]() Click this button for general ordering information, shipping charges, tax, etc.
Click this button for general ordering information, shipping charges, tax, etc.
The main board is fixed into the enclosure with up to six size 4 sheet metal (self-tapping) or M2.5 machine screws. These pass through holes marked HA on the silkscreen into bosses molded into either the base or the top of the enclosure. Holes marked HC on the silkscreen must be drilled out to clear the 0.32 inch diameter pillars that hold the two parts of the enclosure together (if the board is mounted in the top of the case, the pillar diameters are 0.26 inches). ECROS Technology can perform this modification on request. (It is not a good idea to drill out holes on the PCB after components are assembled to it.) The vertical card guides on the enclosure walls do not interfere with mounting a horizontal PCB.
 Batteries
The main board does not fill the base of the enclosure. This allows it to be used with the models that have the 9 volt battery compartment. With other models, the empty space at the right is wide enough to fit a 2-wide pack of AA cells. Depending on the enclosure height, either a four or six AA cell pack will fit. Many other battery configurations are possible.
It goes without saying that if you mount an LCD on the main board and then put it in an enclosure, you'll need to cut a hole in the top to see the display. The appearance of the finished product is best if either
The first method has the advantage that you don't have to make a decal, but the cut edge of the top of the enclosure is visible and needs to be tidy. A beveled edge looks best, which requires some fancy work with a Dremel or similar tool. The second method allows the hole to be rough since it is covered with the decal. Of course, the hole has to be larger to clear the bezel rather than just the viewing area. The ECROS Technology Prius Mini-Scanner uses this second method, but mainly because a rather thin enclosure is used and this is the only way things would fit.
The Prototyping System fits in the Serpac enclosures with a little too much room, which is easier to deal with than not enough. The following sections assume you will mount the display just behind the inside surface of the enclosure (the first method, above).
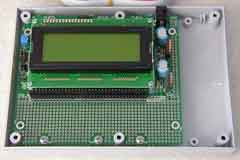
) Two-high Stack in Serpac 171 / 171i (1.52 in.) Enclosure
Two-high Stack in Serpac 171 / 171i (1.52 in.) EnclosureIf you mount the LCD on the main board and then the main board into the enclosure, you have a two-high stack of printed circuit boards. With the Serpac 171, the LCD will be less than 0.1 in. below the inside surface of the top. The main board can be spaced away from the bosses in the base of the enclosure to lift the display to the right position. Alternatively, the display can be spaced a little further from the main board.
) Testing in a Serpac 171i enclosure suggests that a lift of about 0.075 in. is needed. Nylon washers are available from Mouser (catalog 616, page 1015) in thicknesses of 0.032 and 0.062 in. Two of the former or one of the later do an adequate job. For extra space between the display and the main board, use screw size 2 washers on top of the mounting pillars (just like the ones already underneath the pillars). To lift the main board, you can use screw size 4 washers. However, it will be tricky to hold these in place as you assemble the board into the box. Size 2 washers will not slip over the fixing screws but will need to be threaded on and so will stay in place. Some experimentation may be needed. (Click on pictures for larger versions.)
Testing in a Serpac 171i enclosure suggests that a lift of about 0.075 in. is needed. Nylon washers are available from Mouser (catalog 616, page 1015) in thicknesses of 0.032 and 0.062 in. Two of the former or one of the later do an adequate job. For extra space between the display and the main board, use screw size 2 washers on top of the mounting pillars (just like the ones already underneath the pillars). To lift the main board, you can use screw size 4 washers. However, it will be tricky to hold these in place as you assemble the board into the box. Size 2 washers will not slip over the fixing screws but will need to be threaded on and so will stay in place. Some experimentation may be needed. (Click on pictures for larger versions.)
If you mount the LCD on the main board, the main board to an expansion board and then the expansion board into the enclosure, you have a three-high stack of printed circuit boards. With the Serpac 172, the LCD will be will be less than 0.1 in. below the inside surface of the top. This assumes you use 0.437 in. PCB supports (Mouser catalog 616, page 1016, stock no. 561-DMSP437) between the main board and the expansion board, this being the closest spacing using the inter-board connectors specified. If you use 0.5 in. supports (561-DMSP500) the gap will be almost nothing. As for the two-high stack, washers can be used under the bottom board or between the LCD and the top board.
ZiLOG and Z8 Encore! are registered trademarks of ZiLOG, Inc.
Copyright © 2004, ECROS Technology, all rights reserved.